→ Configuration → Androis Remote Controls
NOTE: See section 11. RemDroid for additional information.
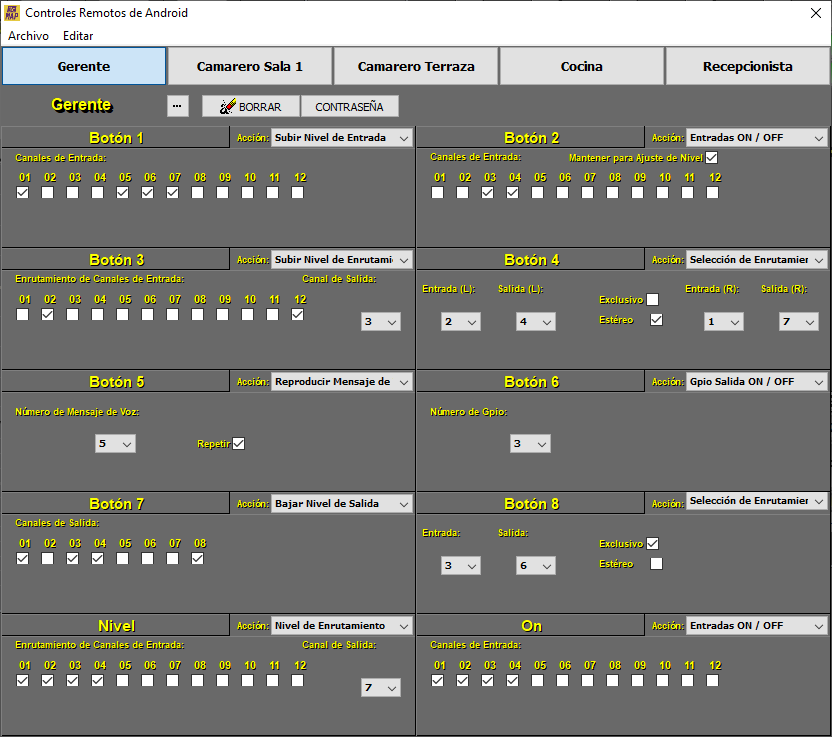
Android Remote Controls configuration window (RemDroid).
You can create up to 5 different Android Remote Control profiles.
The configuration window will show the following elements:
-
File: Load or Save the configuration files of the Scheduled Tasks.
-
Edit: Copy or Paste configuration options for Scheduled Tasks.
-
Profile Buttons: Allows you to select the Android remote control profile you want to configure.
-
Button ...: Allows you to assign a name to the selected Profile, it is recommended to give it a descriptive name. Example: Manager.
-
Clear: Resets the Profile name and parameters to the default values.
-
Password: Allows you to assign a password to the selected Profile.
For each key Button 1 to Button 8 you can define an Action among the following:
-
Inputs Level Up/Down: Each transition will produce a 0.5 dB jump up or down respectively in the level of the selected inputs.
-
Inputs ON/OFF: It produces a cyclical change in the state of the selected inputs between off and on. (*Setting)
-
Inputs ON: Forces the state of the selected inputs to on. It is not cyclical, pressing again will not change the status of the selected inputs to off. (*Setting)
-
Inputs OFF: Forces the state of the selected inputs to off. It is not cyclical, pressing again will not change the status of the selected inputs to on. (*Setting)
*Setting: In the 3 previous options if we leave the option of Hold for Level Adjustment checked, the remote control will allow a level adjustment of the selected inputs by holding down the corresponding button and adjusting with the +/- keys.
-
Outputs Level Up/Down: Each transition will produce a 0.5 dB jump up or down respectively in the level of the selected outputs.
-
Outputs ON/OFF: Produces a cyclical change in the state of the selected outputs between off and on. (*Setting)
-
Outputs ON: Forces the state of the selected outputs to on. It is not cyclical, pressing again will not change the status of the selected outputs to off. (*Setting)
-
Outputs OFF: Forces the state of the selected outputs to off. It is not cyclical, pressing again will not change the state of the selected outputs to on. (*Setting)
*Setting: In the 3 previous options, if we leave the option of Hold for Level Adjustment checked, the remote control will allow a level adjustment of the selected outputs by holding down the corresponding button and adjusting with the +/- keys.
-
Routing Level Up/Down: Each transition will produce a 0.5 dB jump up or down respectively in signal from the selected routing inputs.
-
Routing Selection: Changes the routing inputs on the selected outputs from on (0 dB) to off (-oo) and vice versa. Selecting the Stereo option allows a duo combination. By selecting the Exclusive option, only the last one selected will remain active, canceling the other routes.
-
Preset Recall: Calls the memory of the selected preset within the range 1 to 10.
-
Play Voice Messages: Play a Voice Message from 1 to 5. Selecting the Repeat option activates a continuous loop of repetition of said Voice Message.
NOTE: See section 7.3.5. Voice Message Panel for additional information.
-
Gpio Out ON: Forces the state of the selected GPIO output to on, logic 1. It is not cyclical.
-
Gpio Out OFF: Forces the state of the selected GPIO output to off, logic 0. It is not cyclical.
-
Gpio Out ON/OFF: It produces a cyclical change of state in the selected output between off and on, logic 0 and logic 1 respectively.
The Level Adjustment Bar can perform level adjustment functions depending on the function that is defined:
-
Input Level: Each press of the +/- keys produces a 0.5 dB jump up or down on the selected inputs.
-
Output Level: Each press of the +/- keys produces a 0.5 dB jump up or down on the selected outputs.
-
Routing Level: Each press of the +/- keys causes a 0.5 dB jump to change up or down in the selected routing.
The ON/OFF Button can be configured to perform the following Actions:
-
Inputs ON/OFF: Produces a cyclical change in the state of the selected inputs between off and on.
-
Inputs ON: Forces the status of the selected inputs to on. It is not cyclical, pressing again will not change the status of the selected inputs to off.
-
Inputs OFF: Forces the status of the selected inputs to off. It is not cyclical, pressing again will not change the status of the selected inputs to on.
-
Outputs ON/OFF: Produces a cyclical change in the state of the selected outputs between off and on.
-
Outputs ON: Forces the state of the selected outputs to on. It is not cyclical, pressing again will not change the status of the selected outputs to off.
-
Outputs OFF: Forces the state of the selected outputs to off. It is not cyclical, pressing again will not change the state of the selected outputs to on.
-
Gpio Out ON: Forces the state of the selected GPIO output to on, logic 1. It is not cyclical.
-
Gpio Out OFF: Forces the state of the selected GPIO output to off, logic 0. It is not cyclical.
-
Gpio Out ON/OFF: It produces a cyclical change of state in the selected output between off and on, logic 0 and logic 1 respectively.
-
Recuperación de Preajustes: Makes a memory recall of the selected preset within the range 1 to 10. The remote will light up when loading is complete. This will blink when a change is made to the assigned preset.
-
Play Voice Messages : Play a Voice Message from 1 to 5. Selecting the Repeat option activates a continuous loop of repetition of said Voice Message.
NOTE: See section 7.3.5. Voice Message Panel for additional information.